Square Wheel Setup For The Track

I got what I consider high praise from my instructor during my first track weekend. He said,

I could already drive my M2 better than the OEM tires and brakes could handle.

He recommended I upgrade my tires and brake pads before my next HPDE event in June. I jumped on some of the forums to research wheels and tires. I started to seriously consider several of the APEX wheels that are made to fit the BMW M2. Most of the 18″ APEX wheels where on backorder and I wasn’t confident they would arrive in time for me to get tires fitted on the wheels before June.

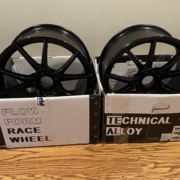
As I dug deeper, I found the Bimmerworld TA5R wheels that got great reviews, were flow formed so they are strong and light weight and would fit my M2 without spacers. My salesperson, John Webb, was a big help in making sure I got what I needed for a square setup while maximizing the tire contact surface.

I settled in on a set of TA5R 18″x9.5″ wheels in black. John recommended a set of wheel studs to make swapping my wheels at the track easier and faster. He also recommended a 255/35/18 tire to make sure the wheels and tires would fit in my wheel wells without rolling the fenders.

Why Go Square?

I won’t pretend to know enough about driving dynamics to explain how having tires that are the same width will impact the performance of the car. From what I have read in the forms this will balance out the grip as the staggered setup tends to break loose in the front when pushing hard. The big appeal to me in having all 4 wheels and tires being the same was to improve tire wear and ultimately keep my costs down. By going down from 19″ wheels to 18″ wheels I can open up the selection of tires that will fit inside my wheel wells and using the same width on all 4 corners means I can rotate the tires to get the maximum life out of each set.

Now on to find a set of tires for my new wheels…

Testing Track Data And Video

As I get ready for my first weekend at the track, I have been testing options for capturing performance data and driving video. The simplest way to start was to use what came with my car, the Mlaptimer app. It is built into the iDrive system in my M2 and works with my iPhone. When it came out it was great, but it hasn’t been updated in some time and doesn’t support newer GoPro cameras. In addition the data file is .Mpower and you have to convert if you want to use it in any other app. All of this is very cumbersome.

After reading several BimmerPost forum threads about different apps, I decided to give Track Addict a try. There is a free version, so very little risk in giving it a shot. It is made by HP Tuners and works with Race Render, the software I am using to add data overlays to my driving videos. Here is a video shot from my iPhone mounted to my windshield that is straight from Track Addict:

Next I took the Track Addict video and added a second camera angle from a GoPro mounted inside my car. This gives me a chance to see how I am steering and shifting the car while driving. The GoPro also has GPS data that can be imported into Race Render. The challenge becomes syncing both videos and I found muting one of the videos made the sound quality better.

For my last test, I used my GoPro camera footage and BimmerLink to capture car data through an OBDII reader. Unfortunately, BimmerLink won’t log the data in the background so I couldn’t also use Track Addict for this test. As you will see in the video that BimmerLink doesn’t log the data fast enough so the overlays show data that jumps up and down. While I would love to use something I already own, this isn’t it!

So for my first track weekend I decided to upgrade to Track Addict Pro ($8.99) and I ordered a VeePeak OBDII adapter that cycles faster than the one I already own. I am not ready to spend the money for a dedicated track data recorder, so for less than $50, I am hopefully that I can produce some decent videos with data of my first track weekend.

Adding Comms To My Stilo ST5 Helmet

One of the best features of Stilo helmets is how adjustable they are. Many of the internal cushions come in different sizes to provide you with a custom fit at an affordable price. These are super easy to remove and replace as well. The ST5 also comes with ports on either side of the helmet to add comms or hydration. After reading several articles with HPDE instructors complaining about their comms units getting beat up during instruction, I decided to install my own as part of my track prep.

I ordered the Stilo Helmet Wiring Kit that works with my ST5. Unfortunately, it didn’t come with any installation instructions and I couldn’t find any online either. So many times I depend on YouTube to show me how to do something, it felt like a real challenge to have to figure it out myself.

Here are the steps I took to add the AE0210 radio kit to my ST5 helmet:

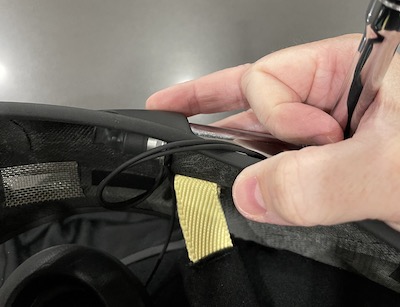
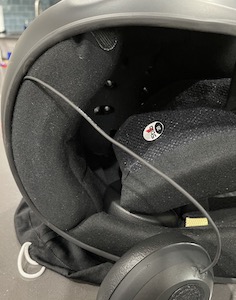
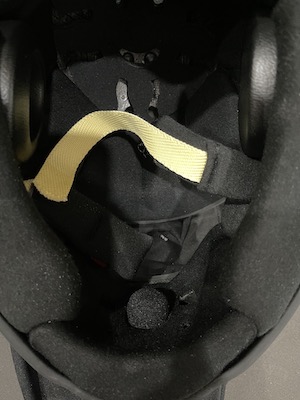
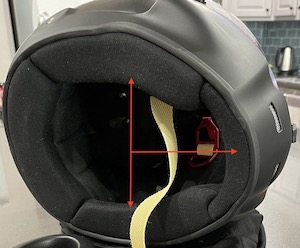
The first step was to remove the front and two side cushions from the helmet. I found it easier to start with the side cushions and then remove the front one. When pulling out the side cushions you need to work the chin straps back through the slots in each cushion.

The next step was to remove the plug to make room for the comms port. You can pick either side of the helmet. I picked the left side port as that is where my connection point is for my Speedcom intercom system is in my car. I was able to pop the rubber plug out by pushing on it from inside the helmet.

I inserted the comms port inside the helmet and held it in place while I used a socket wrench to tighten the bolts on the port. I am a nut for keeping wiring neat and out of site so I paid particular attention to how the wiring would feed to the mic and ear cups once it was locked in place.

I ran the wiring for the right side ear cup around the back of the helmet. The wire tucked neatly into the small lip that runs around the base of the helmet. There was no need to remove the rear cushion, just a little pressure from a finger and the wire disappeared. Then I inserted the right cushion with the speaker back in place.

The next step was adding the microphone to the front cushion. Stilo makes this easy as well. The cushion is pre-fabricated to accommodate the mic so it is as simple as popping out the place holder and adding the mic. There are even three velcro circles for the back of the mic so you can adjust the depth for the best fit. I ended up using all three spacers.

Getting the cushions back in was the hardest part of the install as they fit snuggly together. I had to make several attempts in order to get the front cushion to wedge between the two side cushions. In the end it was easier to put the helmet on and pull on the front cushion through the shield to get in firmly in place.

The final step was to hook it up to my Speedcom and test it out. It worked perfectly!