Dinan Cold Air Intake

After using an Injen Cold Air Intake on my old BMW M235i I was hesitant to do this upgrade. The Injen helped the M235i breath better but the constant “psssst” of the turbo waste gate bleeding off pressure quickly went from cool sounding to annoying. During Memorial Day weekend Turner Motorsport had a sale on all Dinan products so I ordered the Dinan cold air intake for my BMW M2 to try that unit instead of re-using the Injen.

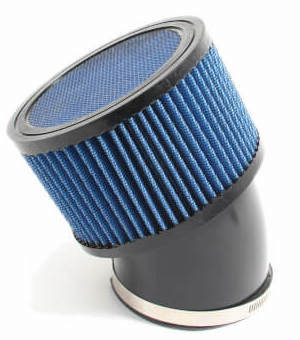
The Dinan cold air intake re-uses the bottom half of the OEM air intake box and replaces the OEM filter with Dinan High Flow Filter. The finished install is very similar to the OEM setup with a filter inside of a sealed box. I was hopefully that this would keep the boost noise to a minimum and I was right. In daily driving I notice just a slight uptick in engine noise, but nothing intrusive.

The installation is relatively plug and play. It took me 2-3 hours from start to finish. I found it easier to remove the base of the OEM air box to replace the existing clips with the smaller Dinan clips. While I had the base out of the car I gave it a thorough washing to help the adhesive foam seal stick better to the base.

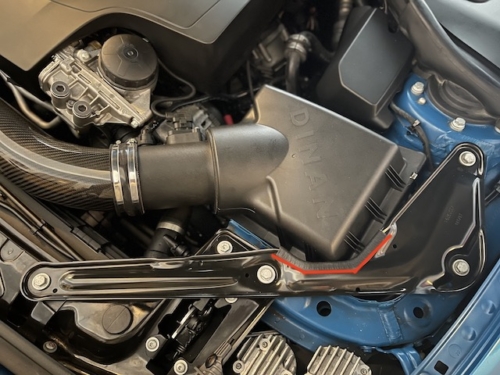
In the M2 or in a convertible 2 series there is some extra bracing that needs to be cut so the Dinan air filter box cover will fit into place. The install kit comes with a rubber gasket to finish off the cut edge of the brace which I highlighted in red in the image. The instructions are pretty straight forward on where to make the cut. I marked the brace with some blue painters tape to give me a nice straight edge to follow. A grinder with a metal cutting wheel made quick work of this and I used a fine grit sandpaper to clean up the edges before putting on the gasket.

By the seat of my pants it seams like the car is breathing better but this upgrade isn’t going to throw your head back with extra power.

Removing The iPhone Warmer

BMW does a good job of keeping up with the latest tech but sometimes that tech doesn’t last long. My 2017 BMW M2 was ordered with the Executive Package. At the time, wireless charging was relatively new and having a way to securely lock your phone in place inside the armrest while it charged seemed like a cool new feature. Shortly after 2017 phones grew in size and wireless charging got faster.

The wireless charger in the M2 has earned the nickname as the iPhone Warmer as it heated up the phone more than it would charge it. As phones have grown, the locking mechanism that holds a phone in place has become obsolete. Only the smallest of modern phones will fit. Since I typically get the biggest phone I can I decided to remove the charger and install the center console mat that would be in a car without wireless charging.

There are tons of how-to posts online. I found this thread on a F30 BimmerPost helpful as it has some good pictures and links to videos.

The steps for removing the wireless charger in my M2 were similar:

  1. I used two trim removal tools at the front of the wireless charger to pry it up. This took a lot more force than I anticipated so pry hard!
  2. I ended up separating the wireless charging cradle from the base, but this is no big deal, I just continued to pry until the entire tray popped out.
  3. This is wired to a couple of connectors that you have to access through the vents to the backseat at the base of the armrest.
  4. To remove the rear AC vents I used a trim removal tool and gently worked to snap that out. Prying about 1/4 of the way in from either side put the trim tool on the plastic tabs holding it in place.
  5. After putting the AC vents to one side I was able to easily access the two wires that needed to get disconnected. The one on the right is simple to remove as you just slide the grey lever to the left and pull the connector out.
  6. The smaller connection with the pink tabs gave me some fits as it isn’t obvious how to get these apart. I used a small flat head screw driver on the tab at the end of the connector to help release this connection.
  7. I tucked the loose connector with the pink tab back into the mounting bracket to keep it out of the way.
  8. From the center console you can pull the wires through to fully remove the wireless charger. You may have to push the AC vent tube to the left to make room for the connections to get through but I didn’t have to remove it as some suggest.
  9. Once the wires are past the vent they pretty much pull right out and all you have to do is snap the rear air vents back in place and drop the rubber mat in the center console and you are done.

Not sure why I did this other than it cleans up the inside of the center console so if I ever to decide to use it for something it will be ready…

Dedicated Track Brake Pads

On the advice of my instructor from my first track weekend at AMP I purchased a set of Hawk DTC-60 track only brake pads. Like everything track related, high performance track pads can be expensive. I found a set of Hawk DTC-60 track pads for the M2 on sale at TireRack. I swapped out my OEM pads for these before heading to Roebling Road Raceway for the Peachtree Chapter of the BMW CCA’s summer driving school.

Here is the YouTube video from Fatal Garage I used to help me with the install:

Like most YouTube how-to videos, it is never as easy as it looks!

Here are few things I need help with that the video didn’t cover:

  1. Pulling the pins out of the calipers was not easy and I used a pair of vice grips to help. It might be easier to use some PB Blaster or WD-40 before you try to pull the pins.
  2. My OEM pads didn’t exactly slide out and I had to really push and pull on them to move the piston back enough to get them out.
  3. The brake pad monitoring system cables on the back right and front left brakes doesn’t just pop off or snap back in without some help. I used a flat head screw driver to help pop these off and to help push them back into place on the track pads.
  4. The new thicker track pads didn’t just slide into the calipers. I was able to put my fingers inside the calipers to push the pistons in to open up the space for the new pads.
  5. The video doesn’t cover bedding in the new pads. I used this article from TireRack on how to bed in new brake pads once I got the track pads installed.

These pads are not intended for daily driving and tend to squeak. I put up with that annoyance for the few days between installing the pads and heading to the track. The Hawk DTC-60s have noticeably more bite than the OEM pads and performed great on the track. The challenge was getting used to how much pressure to apply to the brake pedal. When I wanted to lightly brake I just had to think about pushing on the pedal to get a little brake pressure.

After a weekend at the track, putting the OEM pads back on the M2 was much easier. I knew what I was doing and the components had all been cleaned so they went in and out smoothly.